Brooke Menard

This project is about developing a character from rough sketches to a full 3D model. The rough sketches are to help me gain an idea about how the character moves, acts, and reacts. I have never made a 3D model before so this process was a learning experience. Tin foil is a strange material to work with, in my opinion. I underestimated the level of difficulty molding the tin foil presented. It’s a basic kitchen supply, how hard could it be to work with? It turns out it is not as easy as I initially thought. I did have fun. Seeing the final product after spending several hours crafting sticky polymer clay brought a joyous sense of accomplishment.
Step 1:
Rough Sketch

Colin McCamy

This illustration was done in Photoshop, and is based on a very rough worldbuilding project I have worked on for a couple of years. The turtle/dragon and rider have been some of the earliest concepts in the project, but they’re constantly being refined.
Rough Sketch:
To start, I drew several very rough sketches of how I wanted the landscape to look. At least at the start, I was influenced by the Australian outback, but some scenery elements I had planned, like plateaus, were scrapped early on.

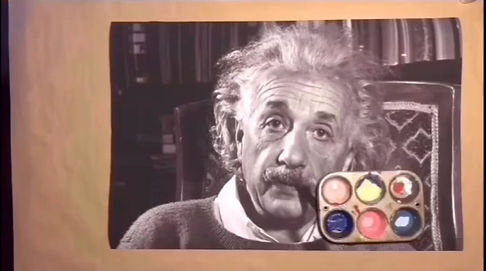
Ellie Turner

I created this photo and paint collage focusing on Albert Einstein. I painted the mass–energy equivalence over and over in a line formation and contrasted the static structure with some flowy wisps from his pipe. The goal was to show the balance of work and relaxing. Sometimes our best ideas hit us when we’re just on a little break.
Haydin Hall

The books I chose to redesign are from the Harry Potter Series. I have always been a huge fan of J.K. Rowling's work and will continue to be. I chose the books: Chamber of Secrets, Prisoner of Azkaban, and Goblet of Fire.
My work process always begins with sketches. Below you will see sketching that was created through the use of Procreate. Each item is related to each individual book and pertains to something that happens.
I absolutely love patterns. So, I created patterns for each of the book with the elements I had created. When picking out the color scheme I went with the original book colors.

Landon Howard

The idea behind this project was to create an icon or avatar for
myself that I thought represented me in a fun, unique way. I have been fascinated with knight armor and imagery for a long time now, and
I thought it would be fun to portray myself as a knight with a digital stylus as my sword and a color wheel as my shield. I created my avatar in a bobblehead-esque style with a big head and exaggerated proportions to make the design fun and exciting. The name for my artist avatar is The Art Knight, a sort of alter-ego to my artist brand. I decided to leave my character black and white to emphasize contrast and to allow the color wheel to really pop. This was a fun concept to execute and incorporate into my branding.

Step 1
Maleah Clayton

The concept behind my self portrait was to show my combined interest in graphic design, fine art, and building pieces by hand.
Step 1:
To begin the process I used Illustrator to create a vector self portrait from a photo I had of myself. During this part my main focus was on the head and hair, but I also made an outlined form of my torso to use as a template for the cardboard that I was going to be using.
After being finished with the design I saved a detailed version of my head in order to print. I also saved a file of the head and torso as a silhouette in order to transfer it to be cut by my Cricut machine.

Nicole Paiz

I learned throughout the years that graphic design and art is not
just about me trying to dictate what the materials are going to do.
I try to let the materials speak back to me as I work.
If something doesn't work at first, it's okay, it lets me keep playing and trying. During this process I was basically just playing with Procreate.
I really enjoyed this conversation with digital color pencils.

Rachael Venable

I created my self-portrait with cut paper. Each step of the process is built off of the previous step - I started with the shape of my head, and based on that shape I was able to sketch and cut out my neck and hair.
I like this process because it’s so hands-on and simple.
It reminds me of the crafts I did when I was little.

Samuel Young

Step 1:

